
What Is the Google Drive Integration?
Google Drive is the storage and organization layer for Maverick’s Google Sheets exports. When you export project task data from Maverick, the Drive integration handles where that file lands — placing it into a folder you specify, creating any missing folder segments along the way, and optionally updating an existing file instead of generating a new one on every export.
The same credentials that power the Google Sheets integration also authorize Drive access. Google requires both the Sheets API and the Drive API to be enabled in your Google Cloud project: the Sheets API reads and writes the spreadsheet data itself, while the Drive API handles folder navigation, file placement, and file sharing. Both APIs must be enabled in the same Cloud project — configuring one without the other will produce a 403 error on export.
Maverick requests the DriveFile scope, which limits its visibility to only files that Maverick itself created. It cannot browse, read, or modify any other files in your Google Drive. This scope is narrower than the full Drive scope and is sufficient for all folder organization and file management features described on this page.

Drive Folder Organization
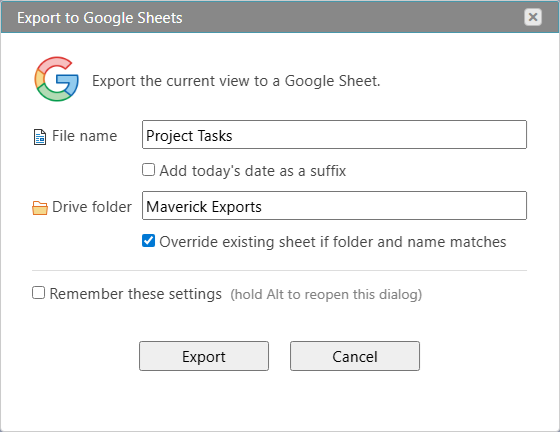
The Drive folder field in the export dialog accepts any folder path you want the exported file to land in. Leave it blank to save the file to the root of My Drive. Enter a single folder name to place the file in a named top-level folder. Use forward slashes to express a nested hierarchy — for example, Clients/Acme/2026 places the file three levels deep.
Maverick creates any missing folder segments automatically, in order from left to right. If Clients already exists but Acme does not, Maverick creates Acme inside Clients and then creates 2026 inside Acme. If all three already exist, Maverick navigates into them without creating duplicates. Folder paths are case-sensitive — clients and Clients are treated as different folders.
Override and Snapshot Modes
The export dialog offers two modes for handling repeat exports to the same folder:
- Override existing sheet (checkbox checked) — Maverick searches for a spreadsheet with the same name inside the specified folder. If one is found, its contents are replaced with the new data. If no match is found, a new file is created. This keeps a single up-to-date file in the folder rather than accumulating duplicates.
- New file on every export (checkbox unchecked) — a new spreadsheet is always created, even if a file with the same name already exists. Combined with the Add today’s date as a suffix option, this builds a dated archive of exports over time without manual renaming.
The override lookup is name-and-folder specific: two files with the same name in different folders are treated as distinct files. Moving a file out of the specified folder before the next export causes Maverick to create a new file rather than updating the moved one.
Remembered Settings
The export dialog includes a Remember these settings option that saves your folder path, date suffix preference, and override checkbox to local browser storage for that view. On subsequent exports from the same view, the dialog is skipped and the saved settings are used directly. Hold Alt while triggering the export to reopen the dialog and change the settings at any time.
File Ownership and Sharing
Which auth mode you configure determines who owns the exported file in Google Drive and how it appears in the exporting user’s Drive view.

Service Account
When Maverick exports using the service account, the spreadsheet is created in the service account’s own Google Drive space. Maverick then immediately shares that file with the requesting user’s Google account email, granting write access. The file appears in the user’s Shared with me section of Google Drive, not in My Drive. The user can move it to their own Drive from there if preferred.
The service account operates without a user session — it authenticates server-to-server using a JSON key file. This makes the service account path well-suited for scheduled or automated exports that run independently of any individual user being logged in.
OAuth2 / Personal Account
When an employee connects their personal Google account via OAuth2, Maverick exports using that user’s own credentials. The spreadsheet is created directly in the user’s My Drive — no sharing step is needed because the file belongs to the user from the moment it is created. The file appears immediately under the specified folder path in My Drive.
Each employee connects their own Google account independently through Tools → Google Integration → Connect Google Account. Maverick stores a refresh token per user; tokens remain valid until the user clicks Clear or revokes access in their Google account security settings.
Both Auth Modes
Configuring both Service Account and OAuth2 simultaneously gives Maverick a fallback strategy. When a user has connected their personal Google account, Maverick uses their OAuth2 tokens — the file goes directly into My Drive. For users who have not connected a personal account, Maverick falls back to the service account path and shares the resulting file. This hybrid setup lets each employee choose their preferred experience without requiring all users to complete the OAuth2 consent flow.
Start with Tools → Google Integration
![]()
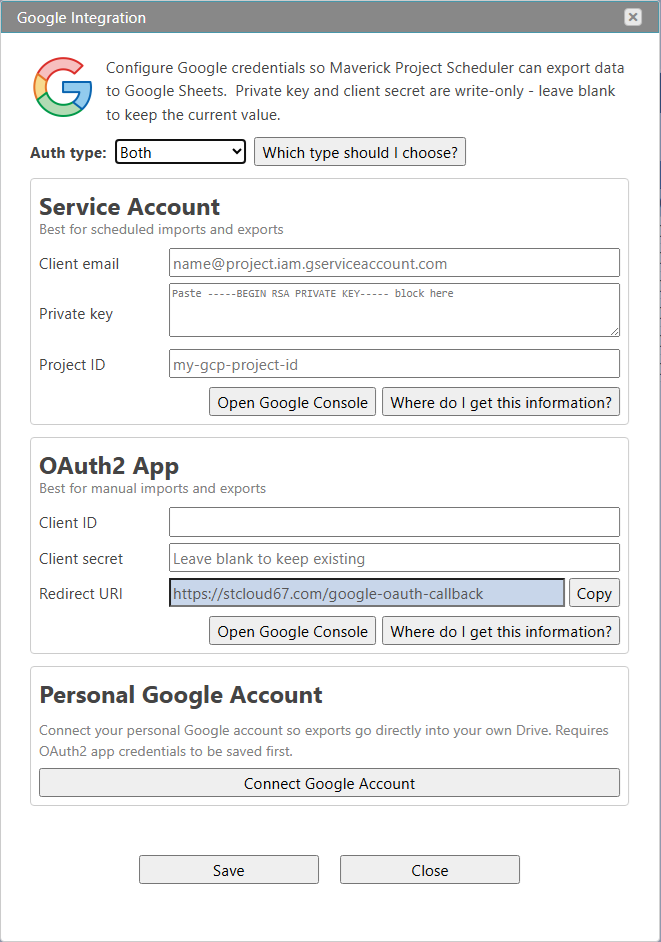
Before gathering credentials from Google Cloud Console, open the Google Integration dialog in Maverick so you can see exactly which fields need to be filled in and copy the pre-filled redirect URI. In Maverick, go to Tools → Google Integration. The dialog opens immediately — no project needs to be loaded first.
The dialog has three panels stacked vertically. The Auth type dropdown at the top determines which panels are active. Select Service Account to enable only the server-side credential panel, OAuth2 App to enable only the personal account panel, or Both to configure all panels at once.
The three panels are:
- Service Account — three fields: Client email, Private key, and Project ID. These come from the JSON key file you download from Google Cloud Console. The private key field is write-only once saved — it displays blank on reopening, but the stored value remains active. Leave it blank if you only want to update other fields.
- OAuth2 App — three fields: Client ID, Client secret, and Redirect URI. The Redirect URI is pre-filled and read-only — copy it from here and paste it into Google Cloud Console when registering your OAuth client.
- Personal Google Account — a Connect Google Account button that each employee uses to authorize their own Google account via the OAuth2 consent flow. Available only after OAuth2 app credentials have been saved.
Drive access uses the same credentials as the Google Sheets integration — there are no additional Drive-specific fields in this dialog. If you have already configured credentials for Google Sheets, Drive access is included automatically.
Before You Start — Enable the Drive API
The Drive integration uses the same Google Cloud project as the Google Sheets integration. If you have already enabled the Sheets API and configured credentials for the Google Sheets integration, you only need to confirm that the Drive API is also enabled in the same project. If you are starting fresh, follow the full setup guide for Google Sheets and enable both APIs during the same session.
- Open Google Cloud Console at
console.cloud.google.comand sign in with a Google account that has Owner or Editor rights on the project. - In the top-left project dropdown, confirm you are in the correct project — the same one associated with your service account or OAuth2 app credentials.
- In the left navigation, go to APIs & Services → Library.
- Search for Google Drive API and click Enable. If it shows as already enabled, no action is needed.
- Confirm Google Sheets API is also enabled in the same project.
Both APIs must be active in the same project. Enabling Drive in a different project than the one tied to your credentials will result in a 403 Access Denied error even though Drive appears enabled.
For a complete walkthrough of obtaining Service Account credentials (JSON key file) and OAuth2 app credentials (Client ID and Client secret), see the Google Sheets integration guide. The credential setup process is identical for both integrations — the same credentials authorize both Sheets and Drive access.
Export with Drive Folder Settings
With credentials configured, trigger a Google Sheets export from any Maverick project tasks grid. Right-click any row to open the context menu and choose Export → Google Sheets, or find the same option in the application ribbon under File → Export. The export dialog opens with all Drive-related options available.
Drive-Specific Export Options
- Drive folder — the destination folder path inside Google Drive. Enter a single folder name or a slash-separated path such as Clients/Acme/2026. Leave blank to save directly to the root of My Drive. Maverick creates any missing folders automatically.
- Add today’s date as a suffix — appends the current date to the file name on every export, creating a new dated snapshot instead of overwriting the previous one. Useful for weekly status reports where you want a full history of snapshots.
- Override existing sheet if folder and name match — when enabled, Maverick searches the specified Drive folder for a sheet with the same file name and overwrites it. When disabled, a new file is always created even if one with the same name already exists.
- Remember these settings — saves the current options in browser local storage so they are applied automatically on the next export from this view. Hold Alt during export to reopen the dialog.
After clicking Export, Maverick contacts Google, creates or updates the spreadsheet, writes all header and data rows, applies row-level formatting from the Maverick grid, places the file in the specified Drive folder, and returns a URL to the sheet. The exported spreadsheet opens in a new browser tab.
Row formatting — background colors, bold, italic, and text colors — is applied directly to the Google Sheet to match the Maverick view. A critical path task shown in amber in Maverick appears in an amber row in the sheet. Summary tasks rendered in bold in Maverick are bold in the export. No manual reformatting is needed after the export.