
What Is the Google Sheets Integration?
Maverick exports project task data to Google Sheets — any grid view, with all visible columns, preserving the same row formatting (background colors, bold text, and italic text) that you see in the Maverick interface. A critical path task that displays in amber in Maverick shows up in an amber-tinted row in Google Sheets. A summary task that appears in bold in Maverick is bold in the sheet. No manual reformatting required.
Exports go directly to your Google Drive. Maverick creates a new spreadsheet, writes the header row from your column names, fills in the data rows, and applies all row-level formatting in a single operation. You can configure a Drive folder path — Maverick creates any missing folder segments automatically — and optionally override an existing sheet so the same spreadsheet is updated on every export rather than creating duplicates.
In the other direction, Maverick can import project tasks from any Google Sheet. The import reads the first row as column headers and maps each column to a task field by name. Any Google Sheet that your team already maintains — a list of milestones, a punch list, a status tracker — can become a Maverick project in seconds.

Start with Tools → Google Integration
![]()
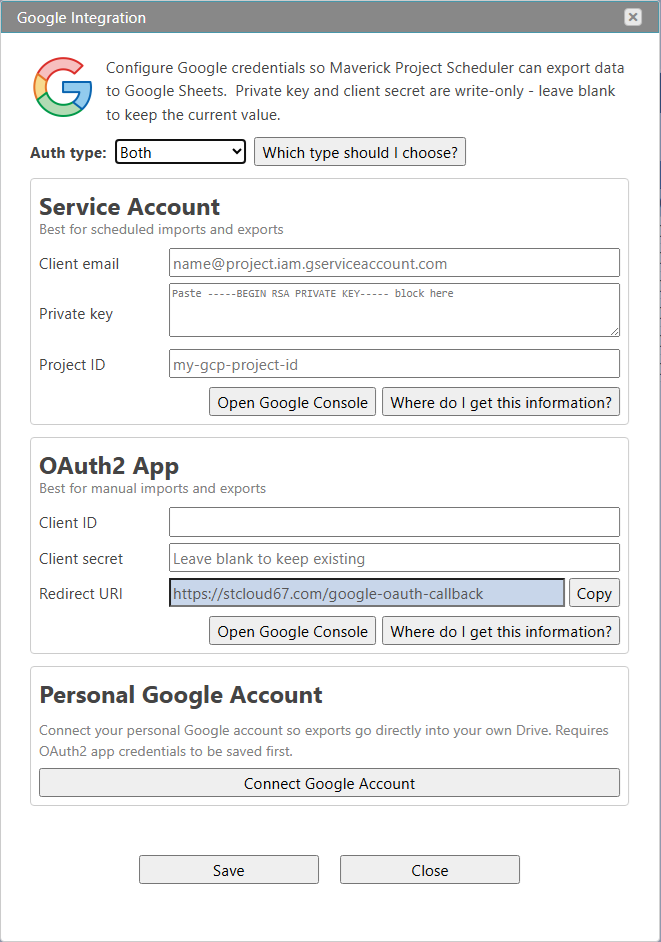
Before you start gathering credentials from Google Cloud Console, open the Google Integration dialog in Maverick so you can see exactly which fields you need to fill in and copy the pre-filled redirect URI. In Maverick, go to Tools → Google Integration. The dialog opens immediately — no project needs to be loaded first.
The dialog has three panels stacked vertically. The Auth type dropdown at the top determines which panels are active. Select Service Account to enable only the server-side credential panel, OAuth2 App to enable only the personal account panel, or Both to configure all panels at once. You can always return to change the auth type later.
The three panels are:
- Service Account — three fields: Client email, Private key, and Project ID. These come from a JSON key file you download from Google Cloud Console. Once saved, the private key field is write-only — it will display blank on reopening but the stored value is still active. Leave it blank if you only want to update other fields.
- OAuth2 App — three fields: Client ID, Client secret, and Redirect URI. The Redirect URI is pre-filled and read-only — copy it from here and paste it into Google Cloud Console when registering your OAuth client. The client secret is also write-only once saved.
- Personal Google Account — a single Connect Google Account button that each individual employee uses to authorize their own Google account via the OAuth2 consent flow. This panel is available only after OAuth2 app credentials have been saved.
Use the Open Google Console button in either credential panel to jump directly to console.cloud.google.com in a new browser tab. The sections below walk through every step of obtaining the required values.
Service Account vs. OAuth2 — Which Should I Use?
Maverick supports two ways to authenticate with Google. You can configure one or both. The choice affects who owns the exported sheets and how exports are triggered.
Service Account
A service account is a non-human Google identity that belongs to your Google Cloud project. When Maverick exports using the service account, the sheet is created in the service account's Drive space and then shared with the requesting user so the sheet appears in their own Drive. This auth mode is best for scheduled, automated exports — the service account operates independently of any individual user's login session.
To configure the service account path, you provide three values from the JSON key file that Google generates: the service account's Client email, its Private key (the full RSA key block), and the Project ID of your Google Cloud project.
OAuth2 App
With OAuth2, each employee connects their personal Google account to Maverick. When they export, Maverick uses their own Google credentials — so the exported sheet lands directly in their own Drive with no sharing step. This is the simpler end-user experience for on-demand exports. The trade-off is that each user must complete a one-time consent flow, and exports can only happen when Maverick holds a valid refresh token for that user.
To configure the OAuth2 path, you register a web application in Google Cloud Console and provide the Client ID and Client secret. You also add the Maverick redirect URI so Google can return the authorization code after the user consents.
Both
You can configure both auth types simultaneously. Maverick will use the OAuth2 tokens when they are available for the current user, and fall back to the service account otherwise. This gives on-demand exports the direct-to-Drive experience while still allowing scheduled exports to run without any user session.
Before You Start — Enable the Required APIs
Both auth modes require the same two Google APIs to be enabled in your Google Cloud project. If you skip this step, exports will fail with a "403 Access Denied" or "API not enabled" error even after credentials are correctly configured.
- Open Google Cloud Console at
console.cloud.google.comand sign in with a Google account that has Owner or Editor rights on the project. - In the top-left project dropdown, select your existing project or create a new one. Note the Project ID shown below the project name — you will paste this into Maverick later.
- In the left navigation, go to APIs & Services → Library.
- Search for Google Sheets API and click Enable.
- Search for Google Drive API and click Enable. The Drive API is required because Maverick needs Drive permissions to create files and move them into folders.
Both APIs must be enabled in the same project where you will create your credentials. If you enable them in a different project than the one associated with your service account or OAuth2 app, exports will fail.
Get Your Service Account Credentials
The service account path requires three credential values: the service account's client email address, its RSA private key, and the Google Cloud Project ID. All three come from the JSON key file that Google Console generates when you create the key.

Step 1 — Create the Service Account
- In Google Cloud Console, open IAM & Admin → Service Accounts in the left menu.
- Click Create Service Account at the top of the page.
- Enter a name such as Maverick Sheets Export. The service account ID and email address are auto-generated from the name — make a note of the email (it ends with
@your-project-id.iam.gserviceaccount.com). - Click Create and Continue.
- In the Grant Access step, assign the role Editor (or at minimum the Google Sheets Editor and Drive File roles). Click Continue, then Done.
Step 2 — Download the JSON Key File
- On the Service Accounts list, click the email address of the account you just created.
- Click the Keys tab.
- Click Add Key → Create new key.
- Select JSON and click Create.
- A
.jsonfile downloads immediately. Store it securely — this is the only time Google will give you the private key.
Step 3 — Extract the Three Values
Open the downloaded JSON file in a text editor. It looks like this:
{
  "type": "service_account",
  "project_id": "my-gcp-project-id",
  "private_key_id": "abc123...",
  "private_key": "-----BEGIN RSA PRIVATE KEY-----\nMIIEo...\n-----END RSA PRIVATE KEY-----\n",
  "client_email": "maverick-sheets@my-gcp-project-id.iam.gserviceaccount.com",
  ...
}
- Copy the
client_emailvalue → paste into Client email in Maverick. - Copy the entire
private_keyvalue including the-----BEGIN RSA PRIVATE KEY-----and-----END RSA PRIVATE KEY-----lines → paste into Private key in Maverick. The key contains literal\nsequences in JSON — Maverick handles these automatically. - Copy the
project_idvalue → paste into Project ID in Maverick.
Get Your OAuth2 App Credentials
The OAuth2 path requires a Client ID and Client secret from a web application credential registered in Google Cloud Console. You also need to add Maverick's redirect URI so Google can return the authorization code after a user grants consent.
Step 1 — Configure the OAuth Consent Screen
Before you can create an OAuth client, Google requires you to configure the consent screen that users see when they authorize Maverick.
- In Google Cloud Console, go to APIs & Services → OAuth consent screen.
- Select Internal if all users are in your Google Workspace organization (recommended for company deployments — no Google review required). Select External if users outside your organization need to connect.
- Fill in the App name (e.g. Maverick Project Scheduler) and a Support email. These appear on the consent screen users see when they click "Connect Google Account" in Maverick.
- Click Save and Continue through the remaining screens. You do not need to add scopes manually — Maverick requests the Sheets and Drive File scopes at runtime.
Step 2 — Create the OAuth Client ID
- Go to APIs & Services → Credentials in the left menu.
- Click Create Credentials → OAuth client ID.
- Set Application type to Web application.
- Enter a name such as Maverick OAuth.
- Under Authorized redirect URIs, click Add URI. Open the Google Integration dialog in Maverick (Admin → Integrations → Google), copy the value shown in the Redirect URI field, and paste it here. The URI looks like
https://stcloud67.com/google-oauth-callback. - Click Create.
Step 3 — Copy the Client ID and Client Secret
A confirmation dialog appears showing your new Client ID and Client secret. Copy both values immediately — the client secret is shown only once in this dialog (you can regenerate it later if needed, but the old one becomes invalid).
- Copy the Client ID (a long string ending in
.apps.googleusercontent.com) → paste into Client ID in Maverick. - Copy the Client secret (a shorter alphanumeric string) → paste into Client secret in Maverick.
The redirect URI is pre-filled in the Maverick dialog and cannot be changed — it is the callback URL that Google uses to return the authorization code after a user signs in.
Configure the Integration in Maverick
With your credentials in hand, open the Google Integration dialog in Maverick. Go to the Admin section and select Integrations → Google. The dialog shows three sections: Service Account, OAuth2 App, and Personal Google Account.
Auth Type
The Auth type dropdown at the top controls which credential sections are active. Choose Service Account to use only server-to-server authentication, OAuth2 App to use only personal account authentication, or Both to enable both simultaneously. Only administrator accounts need to configure this dialog — individual users do not need access to the admin credentials.
Service Account Fields
- Client email — the service account email address ending in
@your-project-id.iam.gserviceaccount.com. Paste from theclient_emailfield in the JSON key file. - Private key — the full RSA private key block. Paste the entire value from the
private_keyfield in the JSON file, including the-----BEGIN RSA PRIVATE KEY-----header and footer lines. The field accepts multi-line input. - Project ID — the Google Cloud Project ID. Paste from the
project_idfield in the JSON file, or copy it from the project selector in Google Cloud Console. This is a short identifier likemy-gcp-project-id, not the project's display name.
The private key and client secret fields are write-only — once saved, the stored value is not displayed again. Leave these fields blank when saving if you only want to update other fields.
OAuth2 App Fields
- Client ID — the OAuth client ID ending in
.apps.googleusercontent.com. Paste from the Google Cloud Console credentials dialog. - Client secret — the short alphanumeric secret. Paste from the credentials dialog. Leave blank if only updating the Client ID.
- Redirect URI — this field is pre-filled and read-only. Copy it from here and add it to the Authorized Redirect URIs list in Google Cloud Console when setting up the OAuth client.
After entering all credentials, click Save. Maverick encrypts and stores all sensitive values. Use the Open Google Console button in either section to jump directly to the Google Cloud Console in a new browser tab.
Connect Your Personal Google Account
Once OAuth2 app credentials are saved, each user can connect their personal Google account so that exports go directly into their own Drive. This step is optional — if you are using only the Service Account mode, no individual account connection is required.
In the Google Integration dialog, click Connect Google Account at the bottom of the dialog. A Google sign-in window opens in your browser. Sign in with the Google account where you want exports to appear. Review the permissions Maverick is requesting (Sheets and Drive File access) and click Allow.
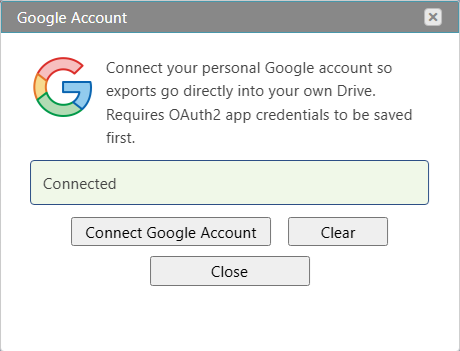
After authorization, the dialog shows Connected in green. Maverick stores a refresh token for your account — this token allows Maverick to export on your behalf without requiring you to sign in again. The token remains valid until you click Clear or revoke access in your Google account security settings.
Each employee completes this step independently in their own Maverick session. The OAuth2 app credentials are shared across the organization (entered once by an administrator), but each user's Google account token is individual and private.
Export to Google Sheets
With credentials configured, the Google Sheets export is available from the same place as other Maverick exports. Right-click any row in a project tasks grid to open the context menu and choose Export → Google Sheets. You can also find the same option in the File menu in the Maverick application ribbon.
Before exporting, configure the view to match the output you want. Apply a filter, set a sort order, show or hide columns. The export captures the current view exactly as displayed — only visible columns are written, in the order they appear, with all row-level formatting intact.
Export Options
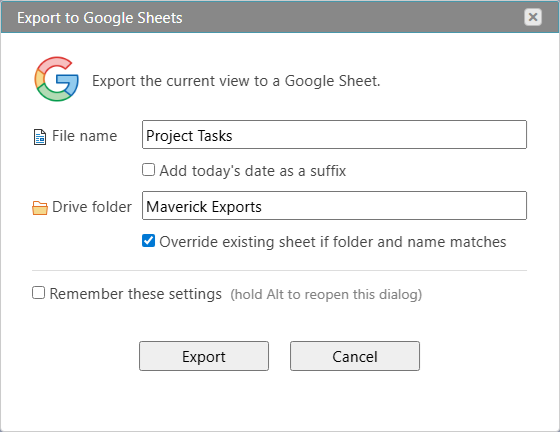
- File name — the title of the Google Sheet that will be created or updated. Defaults to the current view name.
- Add today's date as a suffix — appends the current date to the file name, creating a new dated snapshot on each export rather than overwriting the previous one. Useful for weekly status reports where you want a full history.
- Drive folder — the folder path inside your Google Drive where the sheet should be stored. Enter a folder name or a path such as Clients/Acme/2026. Maverick creates any missing folder segments automatically. Leave blank to save directly to the root of My Drive.
- Override existing sheet if folder and name match — when checked, Maverick finds an existing sheet with the same name in the same folder and overwrites it with the new data instead of creating a duplicate. When unchecked, a new sheet is always created.
- Remember these settings — saves the current options as the default for this view. Hold Alt and trigger the export to reopen this dialog even when settings are remembered.
Click Export. Maverick contacts Google, creates or updates the sheet, writes the header row and all data rows, applies row-level formatting (background color, text color, bold, italic), and returns the URL. The sheet opens in a new browser tab.
The Google Sheet Result
The exported sheet contains one row per task with all visible columns from the Maverick grid. Row formatting from Maverick is applied: summary rows appear in bold, critical path tasks in amber tinting, and any custom row colors from your view are preserved. The Name column is left-aligned; other columns follow the default Sheets alignment.
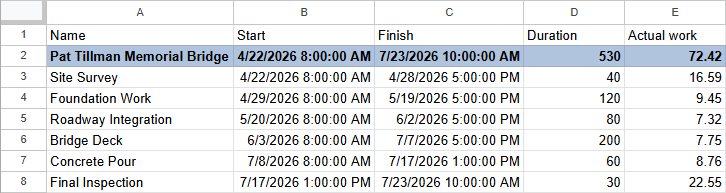
Dates are written as plain text strings in ISO format so they sort and filter correctly in Google Sheets without requiring a format conversion step. Numeric columns — Duration, Actual Work, Percent Complete — are written as numbers so Sheets formulas and charts read them directly.
Import Tasks from Google Sheets
Maverick can read any Google Sheet and create project tasks from its rows. This is useful for migrating existing schedules maintained in Google Sheets, pulling task lists generated by other tools that export to Sheets, or accepting handoffs from teams that plan in spreadsheets before moving to a structured project management tool.
Preparing Your Sheet for Import
The import reads the first row as column headers. Header names must match Maverick's task field names — the same names documented in the project task properties reference. The only required column is the task name. You can include any combination of: Start, Finish, Duration, Percent Complete, and resource name. Columns that do not match a known task field are ignored.
The sheet can have multiple tabs. Maverick lets you choose which tab to read from at import time. Empty rows are skipped automatically.
Running the Import
- In Maverick, open the project you want to import tasks into (or create a new empty project).
- Go to File → Import → Google Sheets in the application ribbon.
- Enter the URL or spreadsheet ID of the Google Sheet you want to import from.
- Select the sheet tab containing your task data.
- Click Import. Maverick reads the header row, maps columns to task fields, and creates one task record per data row.
After import, all tasks behave exactly like tasks created manually in Maverick. You can assign resources, draw dependency links, run the critical path calculator, take a baseline snapshot, and open an AI chat session to analyze and refine the schedule.