Maverick's workspace is organized into three vertical panels that always work together. The Filter panel on the left narrows what you see. The Content panel in the center is where all the work happens — your projects, tasks, Gantt charts, timesheets, and resource views all live here. The Properties panel on the right shows every editable field for whichever record you clicked in the center. Each panel can be pinned open or unpinned and collapsed to a tab so you can reclaim screen space when you need it.
The Filter Panel

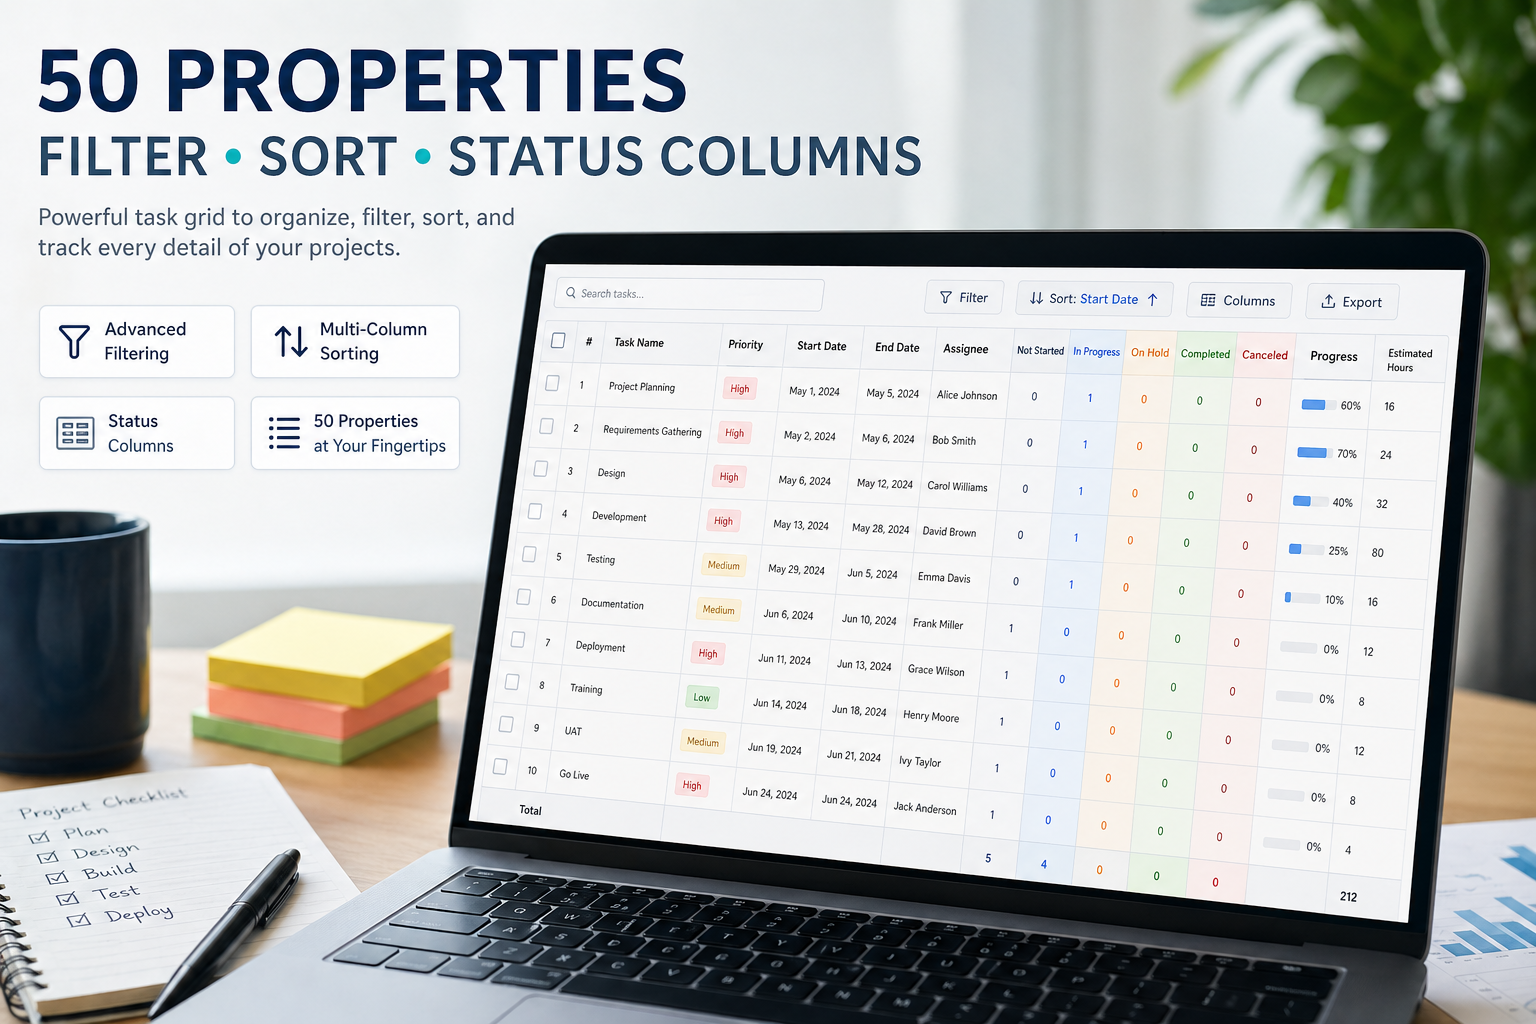
The Filter panel sits on the left side of the screen and controls what the Content panel shows. Every option you set in the Filter panel narrows the content in the center to exactly the subset you want to work with. Filters stack — you can filter by date range AND client AND user AND status simultaneously.
The filter options available include:
- Date range — show only tasks, time entries, or records that fall within a start-to-finish date window you define
- Projects — narrow to a single project or subproject from the project tree; child items follow automatically
- Clients — filter by client name, which automatically limits the project list to only that client's work
- Users — restrict the view to a specific team member, contractor, or resource
- User-defined categories — custom category fields you've created on your projects or tasks, such as department, region, or priority tier
- Billing status — filter time entries and tasks by billing state: unbilled, billed, in progress, or no charge
- Timer status — show only records where a time-tracking timer is currently running or where it has been stopped
- Task completion status — filter by not started, active, complete, or any combination in a single click
- Miscellaneous field search — the search bar at the top of the Filter panel matches against record names, notes, and other text fields for the current content type
Filter options are context-sensitive: when you switch the Content panel from the Projects view to the Timesheet view, the Filter panel updates to show the filters that are relevant to timesheets. You always see the right filters for the content you're looking at.
The Content Panel

The Content panel is the center of the workspace. It's always visible and never collapses — everything you're actively working on lives here. Which data it displays depends on the view you've selected from the main navigation.
Views available in the Content panel include:
- Projects and subprojects — the full project tree: top-level projects and the subprojects nested within them, with key dates and status at a glance
- Project tasks — the task grid for the selected project, with columns for name, start date, finish date, duration, predecessor links, resource assignments, status, percent complete, cost, and more
- Gantt chart — the graphical timeline view with task bars, dependency arrows, critical path highlighting, and baseline comparison
- Timesheets — employee time entries organized by week, with Mon–Sun columns, daily hour totals, and per-project and per-task breakdowns
- Resource allocation — the color-coded bar chart showing whether each human, machine, or material resource is correctly allocated, under-utilized, or over-committed
- Employee availability — a calendar view of when each resource is available versus already allocated to project work
- Users — the full list of human resources, their roles, billing rates, AI provider assignments, and access rights
- Machines — equipment resources and their utilization rates, cost per hour, and current allocation state
- Materials — consumable resources tracked by unit quantity and cost per unit
Click any row, bar, or entry in the Content panel and the Properties panel on the right immediately shows the full record for that item — no separate window, no navigation away from your current view.
The Properties Panel

The Properties panel sits on the right side of the screen. It is a modeless editing panel — you can click any record in the Content panel and its properties appear immediately on the right without opening a separate dialog, modal window, or navigating to a different page. The three-panel layout stays intact while you read and edit.
The properties displayed depend on which type of record you clicked. The same Properties panel shows the right fields for:
- Projects — name, client, start and finish dates, scheduled finish, billing type, scheduling method, AI provider and model, custom scripts, notes, and change history
- Subprojects — all the same fields as a project, scoped to the subproject level within a parent project
- Tasks — name, start date, finish date, duration, predecessor task links, resource assignments, billing rate, status, percent complete, actual work, cost fields, custom category fields, notes, and every additional property available on the task record
- Time entries — date, hours worked, resource name, project and task association, billing status, billing rate, and notes
- Users — name, login email, billing rate, cost rate, weekly capacity, AI provider assignment, skill tags, workgroup membership, and access rights
Every field in the Properties panel is editable in place. Change a task's finish date and save — the Gantt chart in the Content panel redraws immediately. Update a time entry's billing status — the change is reflected in the Filter panel's billing totals without a page reload. The three panels stay synchronized at all times.
Pinning and Unpinning Panels
Every panel in Maverick can be pinned open or unpinned and collapsed. Pinned panels stay locked in place while you scroll and work. Unpinned panels collapse to a narrow tab on the edge of the screen and slide open temporarily when you hover or click the tab.
To pin or unpin any panel, click the pin icon in the panel's header bar. The change is immediate — the Content panel expands to fill the space freed up by the collapsed panel.
Common configurations:
- All three pinned — the standard working layout for task entry, resource assignment, and record editing; the full three-panel view gives you filtering, content, and editing simultaneously
- Filter unpinned, other two pinned — maximizes the width of the Content panel for the Gantt chart on smaller screens; the Filter panel slides in when you need to change the view, then collapses again
- Properties unpinned, other two pinned — useful when you are scanning content without actively editing records; the Properties panel appears only when you click something
- Only Content pinned — a focused view that gives the most screen space to the Gantt or task grid; both side panels open on demand
Maverick remembers your panel state between sessions, so you don't need to re-configure each time you log in. Set it once for each machine you work on and it stays that way.
See the Three-Panel Interface Live
Start a free cloud trial and explore the Filter, Content, and Properties panels on your own projects. Pin and unpin panels to find the layout that fits your screen and workflow.
Access the Free Cloud Trial